Wednesday, January 30, 2013

Antique Roses!

This one is kind of funny actually, the image that inspired me looked nothing like the end result. 


Those are the finished nails in two diffrent lights. Cute, aren't they? 
What inspired me though, was the book cover of Volume 7 of Death Note. 
(Apologies for the picture being upside down. I'm too lazy to rotate it.)

I definitely wanted a beige background, and I figured using the newspaper technique for the lettering would look amazing, so that's where I started.
I applied a light brown polish, and sponged on a very faint, quick layer of a shimmey beige, for texture. Then I applied a matte top coat, because the ink sticks better to it. At least I've heard that somewhere, and it came out well so I'm gonna stick to it (haha, see what I did there? No? ... Okay....).
What you do is, cut out pieces of a newspaper, bigger than your nails, and pick it up with a tweezer. Soak the piece in vodka until it's wet, takes a few seconds. Then apply it over your nail. If you want the text going a certain way, pay attention. Then, what I did was, take a cotton round, dip a corner of it in vodka, and then press the paper on the nail with the wet cotton. After about 10 seconds, I dipped the cotton round again, and pressed for another 10 seconds. Then I peeled the paper off carefully, and the ink was stuck. Sometimes, if you press too hard, a piece of the paper can stick to your nail. It happened on my index finger. If you're careful, you can pull this off with a tweezer. If it's too tiny to be pulled off, don't panic. When you apply a top coat, it'll go invisible. 


Here are my newspaper nails! Of course this is just the background.
I continued with a dark green acrylic paint, mixed with a tiny bit of brown. I made small vines around the edges of my nails. Then I took a beige (white and brown), and mixed it haphazardly with a red (crimson red and brown). I wanted streaks on my brush, which gives the flowers more dimension. I call this the Robin Moses Technique.
I made a few lumps on each nail, over areas where the green vines were too thick or just ugly. 


Then I mixed (fully, this time), a tiny bit of the red with a lot of the beige, to make a lighter shade. I used this to make C shapes around my blobs of color. Tiny in the middle, bigger at the edges. I tried to put them over areas of streaks that weren't good, or where the paint was fully mixed and didn't have streaks at all. 
Finally, I added some beige to the dark green I used for the vines, tried to make it streaky, and put in some simple leaves. And when I top coated, what happened? 


Ugh. I still don't know if it's Seche Vite that's being a b*tch, of if it's my acrylic paints disagreeing with the chemicals of top coat. After seeing this on my thumb, I tried using a matte top coat on the rest of the nails. They still shifted colors, but not as much. I was very annoyed, but there was nothing to do about it. 
The color change makes them look a lot more antique, and when I took a step back and looked at the finished product, I realised that it didn't remind me of Death Note at all. However, my next design is going to be a bit clearer.. 
I still love them, even though they didn't turn out as planned! And I posted this on Robins fanpage, and I'm getting a lot of likes, which I am not used to. It's nice to have people appreciate your work! 
Tialiq

Pink Magnet!

I got a neon pink polish a while ago that I hadn't tried out yet. I'm not much for pink, as you probably know by now. I also got a grey magnetic polish. So I thought, hey, maybe I can combine these?
I had done some testing with the magnetic polish and noticed that if you apply one coat over a color coat, and use the magnet, the color will shine through. I love the effect of this, and decided to make a magnet streak over a neon pink nail.


I started with two coats of my neon pink. I could've just gone with one if I was in a hurry, it had amazing coverage, but I had time and went for two. Then I let it dry over night, because I have been paranoid about using tape since my tape disaster that I have posted on here somewhere.
I cut a long piece of tape in half, and put it on the sides. The tape curved along the shape of the nail, which I really liked and decided to keep. Then I pressed firmly on the edges where I'd put polish. It wasn't as secure over the rest of the nail, which in restrospect was a fantastic idea, since even though it had dried over night, pieces of pink came off where I'd secured it properly.
Then I applied my grey magnetic polish in one, thick coat, and put my magnet over it, as close as I could, for 5 long seconds.
The edges were a bit uneven, not because of bleeding but because tape is see-through and I hadn't aligned it properly. I fixed this with a black stripe, but something was missing. I looked through my box of pretty stuff, and noticed my silver striping tape. You can't really see it in the pictures, but it actually reflects rainbow, and isn't just silver. However, striping tape can be a b*tch to deal with. Even under two coats of top coat, my nails looked like this the day after:


I hadn't cut the ends off tight enough. As you can see on my index finger, that one lasted and that one doesn't reach the edge. But now I know! 
This design had many steps, but it was very quick to make, which was what I needed. The day before, I had attempted an on-nail marble. I had played on a fake nail, and it looked amazing;


Let's compare, shall we?


I tried adding glitter to make it less horrible, and the opposite happened. Oh well, we can't always succeed. 
I'm happy with my magnetic ones though, and those were the ones I wore! You can always try again!
Tialiq

Mystical Green!

At the sale after the holidays, I found this amazing, dark green polish in the "weird-polishes-that-they-haven't-managed-to-sell-and-are-therefore-now-super-cheap"-bin. It reflexes a kind of bronze color, and I knew I had to make it pop somehow. I tried achieving this by putting a simple, light green flower on them.


The one stroke flower is simple, and I used a dark, thin acrylic paint with a thick white. My other hand however, didn't turn out as great.. That's my only problem with one-stroke designs. 
To keep the teardrop shaped theme going on, I also added light green rhinestones to the rest of my nails. I was lucky, and the color was almost exactly the same as my flowers. 
 

Two pictures in diffrent lights. The polish is called Mystical Forest, which (for once when it comes to nail polish names) describes it perfectly. 
I also did a super simple, small half moon mani on my mum, and added a little lace.


In that picture I didn't have two coats of the mystical green on, I had some kind of idea of making it look patchy and only applying one streaky coat but.. I changed my mind. 
Tialiq

Tuesday, January 8, 2013

Pokémon 2000!

Or, it's official name; Pokémon: The Power of One! 
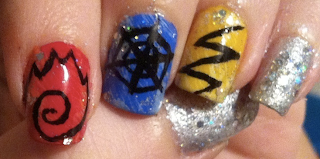
This is probably one of my top 3 favorite films from my childhood, and Lugias Song is still magical to me. I watched it the other day and I had to make a nail art. I decided to go for a minimalistic design of the three legendary birds; Moltres, Articuno and Zapdos. 


My inspiration was this simple image that Prof. Oak draws when he's explaining the current caused by the legendary Pokémon. 


I painted my thumb and pinky a metallic silver, and covered it with sparkles. 
For Moltres, the fire bird, I painted my index finger red, feathered on some orange for texture, and drew a fire symbol. 
For Articuno, the ice bird, I painted my middle finger blue and feathered on light blue. I drew a snowflake, just like in the film.
For Zapdos, the electricity bird, I painted my nail bright yellow, feathered on light yellow and drew a lightning bolt. 
I also added glitter on all the nails over the feathered area.


I absolutely love this design! It's an adorable and easy way to show off geek pride and childhood memories.
Tialiq